Art Explorations #4
Earth Day: Andy Goldsworthy Inspired Land Art Sculpture
Learning Targets:
I can OBSERVE by learning about artist Andy Goldsworthy.
I can EXPRESS an idea by creating a land art sculpture with natural materials.
I can DEVELOP CRAFT by working with natural materials.
I can REFLECT on my work by photographing and posting to my Seesaw journal.
I can OBSERVE by learning about artist Andy Goldsworthy.
I can EXPRESS an idea by creating a land art sculpture with natural materials.
I can DEVELOP CRAFT by working with natural materials.
I can REFLECT on my work by photographing and posting to my Seesaw journal.
|
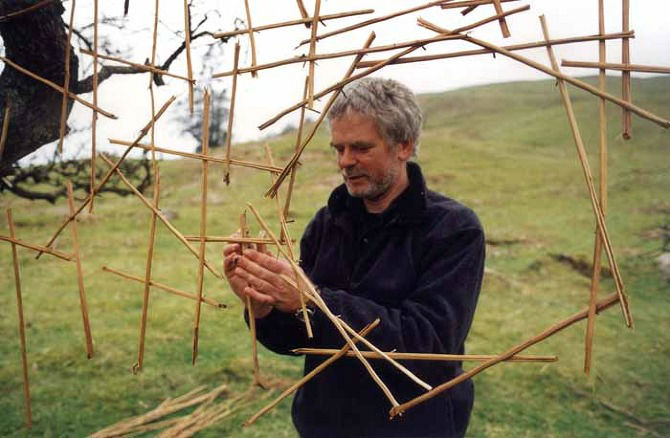
Andy Goldsworthy, (born July 26, 1956, Cheshire, England), British sculptor, land artist, and photographer known for ephemeral (temporary) works created outdoors from natural materials found on-site.
As a teen growing up in Yorkshire, England, Goldsworthy worked as a farm labourer when not in school. That work fostered an interest in nature, the cycles of the seasons, and the outdoors. While in school he discovered his preference for creating art outdoors rather than in the studio. He began to make temporary site-specific works with stones, leaves, sticks, snow, ice, and any other natural materials available to him. Some of his earliest works were rock sculptures at a beach near his art school. He also established the practice of photographing his works once he had completed his art and before the materials and structure succumbed to the elements. Goldsworthy viewed his artistic process as a “collaboration with nature,” in which he was uncovering the essence of his materials and determining what they were capable of. |
|
Examples of Andy's Work
Andy's Process (how he makes his work)
Instructions
After reading about artist, Andy Goldsworthy.
1. Collect materials such as leaves, rocks, twigs, sand…
2. Find an area to work (on the ground, next to a tree, on a fence…).
3. Arrange your items thinking about:
Value - use a variety of dark and light objects to create a design
Texture- use objects with different textures together to create a design.
Color - use similar and contrasting colors to create your design.
You can alter the items by breaking, folding, tearing, digging...
4. Take a picture of your creation (with phone or computer) and post it to you Seesaw.
5. Reflect on your work in a comment or journal post on Seesaw.
Under your photo you can add a comment.
What are 3 things you learned?
What are 2 things you like about your work?
What is 1 thing you would do differently if you were to do it again?
Modification: Think simple. Start with a collection of rocks. see if you can get them to balance to create a larger form.
Extensions: Try creating multiple sculptures specifically identifying one or two art elements or principles of design.
Extensions: Try creating multiple sculptures specifically identifying one or two art elements or principles of design.
Student Examples